Before first use
For the correct functionality of WordBrief© 365 a specially prepared document template (*.dotx) must be created or used. By default, the "WordBrief 365 Dokumentvorlage.dotx" sample template included in the scope of delivery is preconfigured as an example.
Based on the selected Word document template, a document is created. In order to create a letter, certain bookmarks must be present in the template. These bookmarks are automatically accessed by WordBrief© 365 and filled with the relevant data:
- Adresse
- Anrede
- Betreff
- Datum
- Text
Please note: Since the software is initially programmed in German, the German designations must be used here for the above-mentioned bookmarks. In the above given order, the translated names of the bookmarks are "Address", "Salutation", "Subject", "Date", and "Text". The names of the sample files are also based on the German origin and "Brief" stands for letter.
The sample templates included in the scope of delivery can also be reused after your own individual adaptation. The file name of a template can also be renamed as desired. You will find these in your Word default user template directory (the first time you start Word with WordBrief© 365, the sample templates are extracted to the directory).
IMPORTANT: The sample templates contain a form/shape (Text Box) in which text for the address is automatically entered and in which the bookmark Adresse is located. This text box must not be removed and must have the name "Adressfeld". Otherwise an error occurs and WordBrief© 365 does not operate as expected. Keep this text box if you want to customize and use the sample template. Otherwise, you would have to manually assign the name "Adressfeld" to a new text box after inserting it and define the bookmark Adresse in it.
If you are using a new document template: Insert only one text box and rename it using Microsoft® Word's Visual Basic Editor (accessible using the shortcut [ALT]+[F11]), before inserting additional text boxes into the template. Via the Immediate Window (Menu View) and the following entry in it, the required name "Adressfeld" can be defined:
Word.ActiveDocument.Shapes(1).Name = "Adressfeld"
Confirm this entry with the Enter.
Usage
After successful installation of WordBrief©365 you will find the ribbon "WordBrief" in Word. This ribbon contains the buttons Options, Manual, Info and Task Pane, which show or hide a task pane in Word.

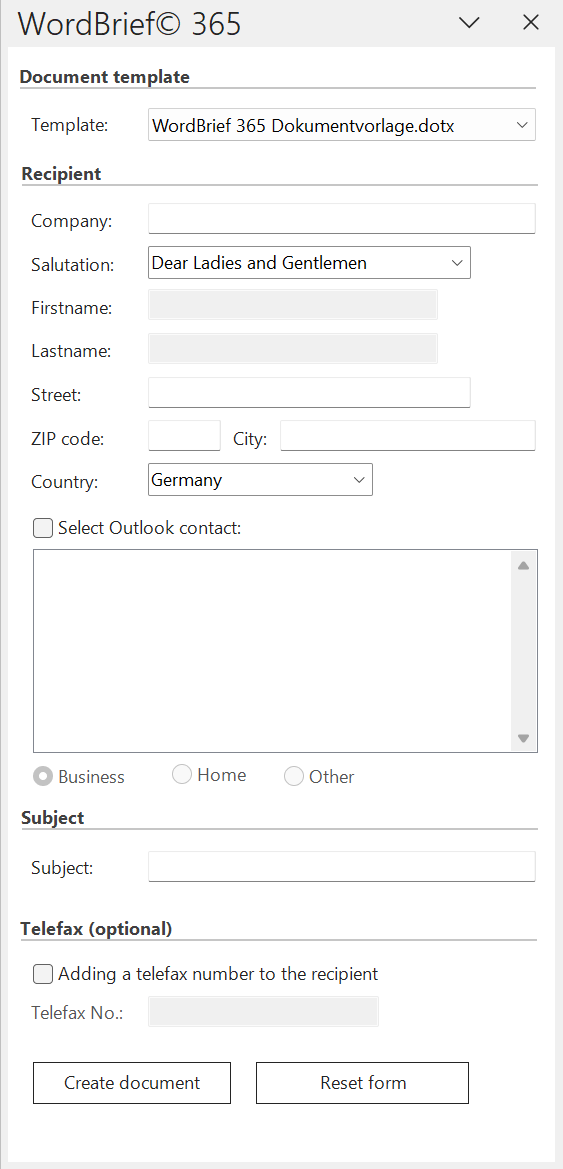
Using WordBrief© 365 is child's play. Within the task pane shown here, either enter the desired data manually or click on "Select Outlook contact" and then select one of your contacts from Microsoft® Outlook. The latter functionality is only available if a version of Microsoft® Outlook is installed and a profile is configured for.
By selecting the document template, you can also select another alternative template for creating a letter, which is different from the standard template for WordBrief© 365. The last template used here will be used as the standard in the future and will be preset in the form.
Note: The information used for the recipient must contain certain mandatory fields in order to use a correct letter address. No letter can be addressed without surname, street, ZIP code and city. If necessary information is missing, WordBrief© 365 will point this out to you. You will also receive a message if you have failed to create a blank document in which the information can be inserted. Please also note that information in the current document is always overwritten by clicking on "Create document".
If you want to start entering new data, click "Reset form" and the form will be reset to the default.
By clicking on the "Create document" button, the previously selected document template is automatically inserted into the current document and filled with the selected information. You can then start writing your text directly.
Options

